Guide
Let's build an imaginary class, Battlemage, that is proficient in heavy armour and many two-handed weapons. We’ll also give it access to a couple of spells.
Start by making a new mod for our class. In this guide, we’ll use Battlemage as the mod name.
Defining Progressions
The first step is to define progression for our new class. This tells the game what the character receives with each level.
Open the Uuid Object Editor.

We’ll add a Progressions table inside our mod.
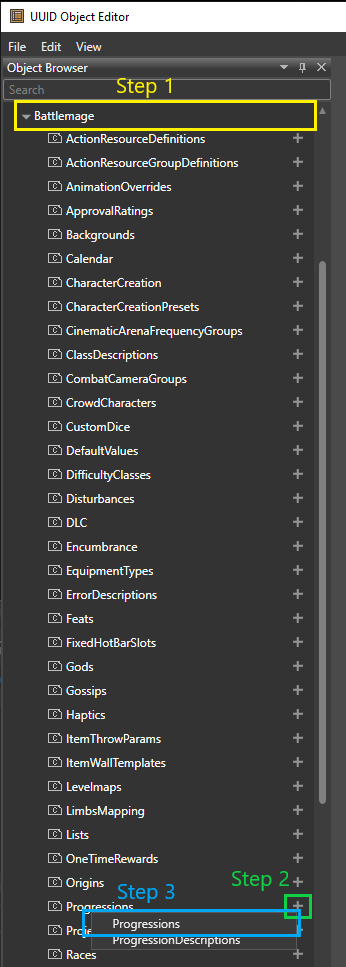
Start editing your newly-created Progressions table by double-clicking on it.

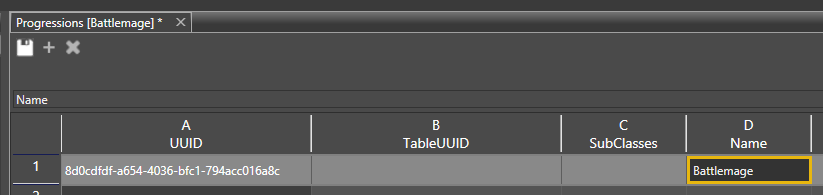
Let’s start with the Name column. This is a technical name that will be used in data, so avoid using spaces. Once you’ve added a Name and pressed Enter, the UUID column should be automatically populated.
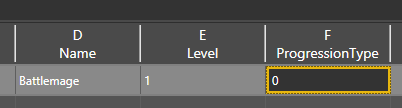
Let’s set the Level to 1, and ProgressionType to 0. This tells the game that this is indeed a class progression.
Next, we’ll need to fill in the TableUUID. This TableUUID is shared between all levels of a class. One quick trick here is to first copy and paste the value from the UUID column into the TableUUID…

…and then right-click on the UUID cell, and select “Regenerate Value” from the dropdown.
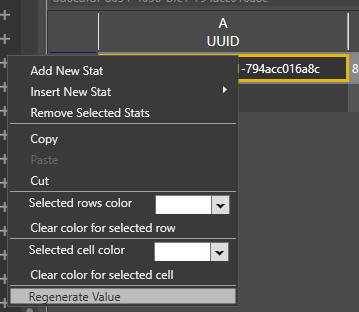
You should now have different values in the UUID and TableUUID columns.

We want to make sure our Battlemage has a few specific traits:
-
2 spell slots
-
Proficiency with all armors
-
Proficiency with all weapons
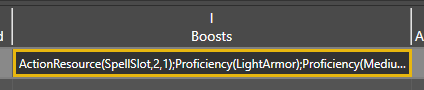
We use the Boosts column to handle this. You can add various proficiencies and resources into Boosts, separating each one with ;.
In this example, our final line will look like this:ActionResource(SpellSlot,2,1);Proficiency(LightArmor);Proficiency(MediumArmor);Proficiency(HeavyArmor);Proficiency(Shields);Proficiency(SimpleWeapons);Proficiency(MartialWeapons)
To make use of those spell slots, our Battlemage will need some spells, so we’ll need to build a list of spells they can have.
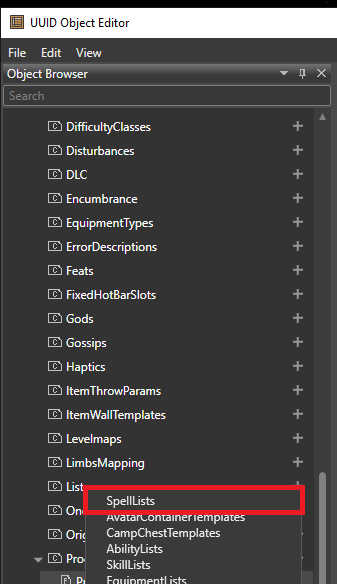
Let’s create a new SpellLists table in the Lists section of the left panel:
We will create two lists in this table: one for cantrips, which will all be given to the character, and a second list for the level 1 spells the player will have to choose from.
Spells in BG3 all have a prefix for their type. For example, Shocking Grasp is referenced as
Target_ShockingGrasp. Any spell can be referenced by this structure:
Type_TechNameIf you’ve made your own spells, perhaps following the How to make a simple spell [[TODO : Update link]] guide, you can use those spells here. The sample spell from that guide, FireTouch, would here have to be referenced as
Target_FireTouch.
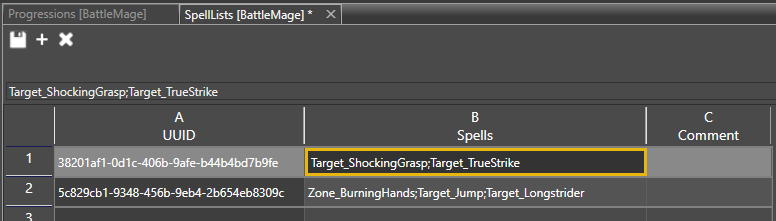
In this example, we’ll give the player Shocking Grasp (Target_ShockingGrasp) and True Strike (Target_TrueStrike) cantrips, and let them select one spell from among Burning Hands (Zone_BurningHands), Jump (Target_Jump), and Longstrider (Target_Longstrider).
This means that our two lists in the SpellLists table will look like this:

Your UUIDs will of course be different.
Now, we’ll take the UUIDs for each list and copy them back into our Progressions table, into the Selectors column.
Since we want to give the character all of the listed cantrips (no choice required), we’ll use AddSpells(). Add the UUID for the cantrip list in between the parentheses.
We want player to choose only one spell from the list, so here we’ll we use SelectSpells(). Add the UUID for the spell list in between the parentheses, followed by two more arguments:
SelectSpells(<UUID>,1,0)
-
The
1means the player will have to pick 1 spell -
The
0means the player will be able to replace 0 of their previous spells
The final line in the Selectors cell should look similar to this (don't forget to change UUIDs for your own):AddSpells(714d1e3d-b436-4af7-9b40-107383e25a5d);SelectSpells(8fd1fe1e-ad9f-4d2c-a4c7-dcc687fc5ae6,1,0)

Let's add couple more levels to the Progression.
Selecting the whole row by clicking on the row number:

Pressing Ctrl+C and Ctrl+V. The row should have been duplicated underneath, but with a new UUID.

Change the Level in your new row to 2 (or higher). Repeat this a few more times, increasing the Level each time, until you have the first 5 levels.
At this time, verify that the TableUUID is the same for all rows, and that each row has a unique UUID.
We can give the Battlemage a few extra cool features by defining more Boosts and Selectors for each additional level. We want to fill in the Progressions table as pictured below (note that your UUIDs will almost certainly be different from this image!):

Let’s go through the additions and explain what’s going on.
-
Level 2, Selectors:
SelectPassives(<UUID>,1,Battlestance)-
This allow the Battlemage their choice of Battlestance.
-
<UUID>: This is the UUID of the PassivesList the Battlemage is choosing from.-
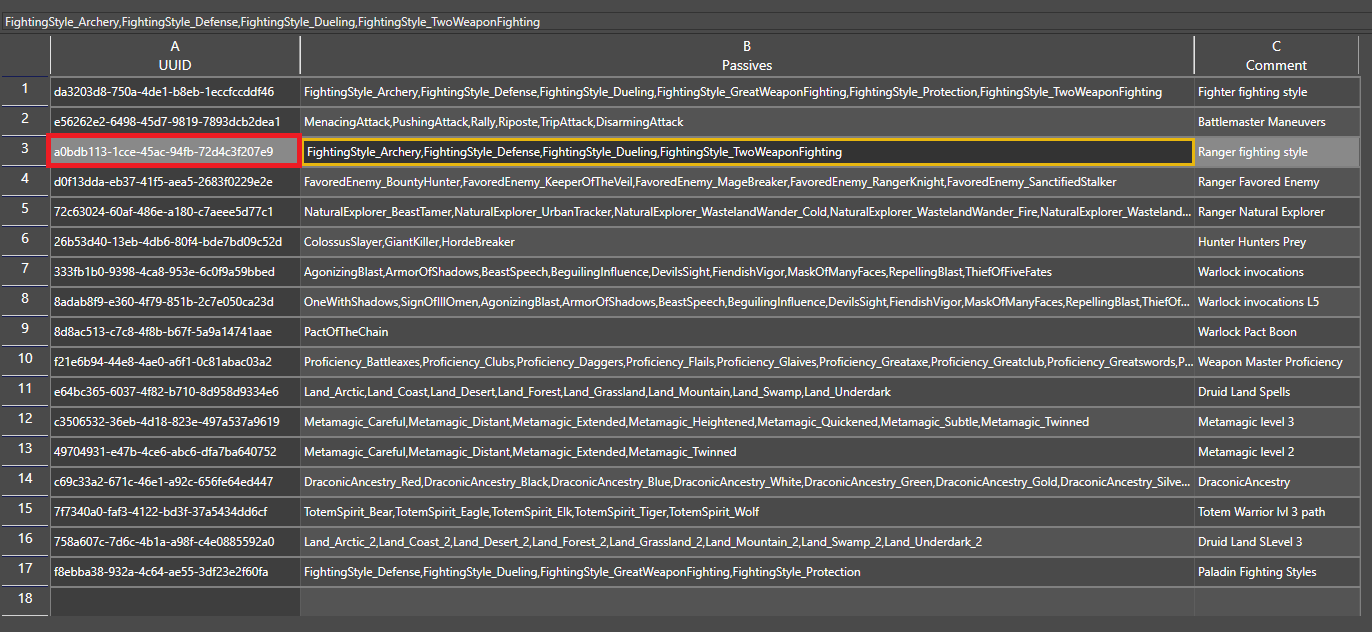
In this example, we’ll just reuse an existing list from the Shared>Lists>PassiveLists table:

-
Find the Ranger fighting styles, and copy the UUID value. Paste this value into the <UUID> part of the Level 2 Selectors:
SelectPassives(a0bdb113-1cce-45ac-94fb-72d4c3f207e9,1,Battlestance)
-
-
1: How many Passives the player can choose. -
Battlestance: This is purely flavour text – sometimes you don’t want the passives to be presented as “Passives”. With this, the game will be asking the player to select a Battlestance, rather than a Passive. If we didn’t want this flavour text, we could simply writeSelectPassives(<UUID>,1).
-
-
Level 2-5, Boosts:
ActionResource(SpellSlot,2,3)-
This gives the Battlemage extra ActionResources. The example here gives the Battlemage an additional two level 3 spell slots.
-
SpellSlot: The type of ActionResource given. -
2: The number of SpellSlots given. -
3: The level of SpellSlot given.
-
-
-
Level 4, AllowImprovement:
Yes-
Marking AllowImprovement as Yes gives the Battlemage access to a Feat at this level, just like other classes.
-
-
Levels 3-5, Selectors:
AddSpells(<UUID>)-
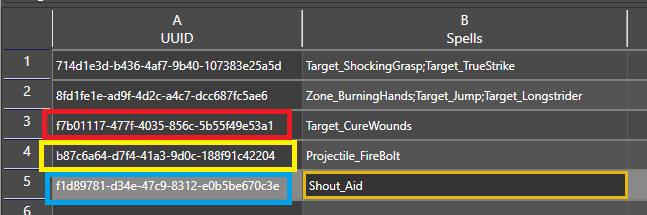
For these, we’re going to go back to our SpellLists table and add a few more rows, defining what Cantrips we’d like to give the Battlemage at levels 3, 4, and 5. Remember that these will all be given. Here’s a basic example of what you could do:

-
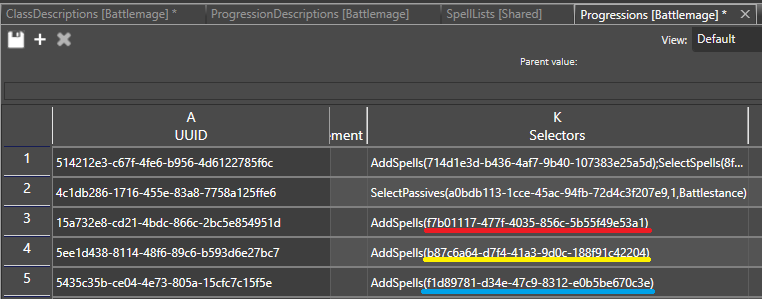
Once you’ve set up the new rows in SpellLists, copy the UUIDs for each list and paste them into the Progressions table, inside the
AddSpells()for the relevant level’s Selector field. Using the above example, it’ll look like this: 
-
Adding Subclasses
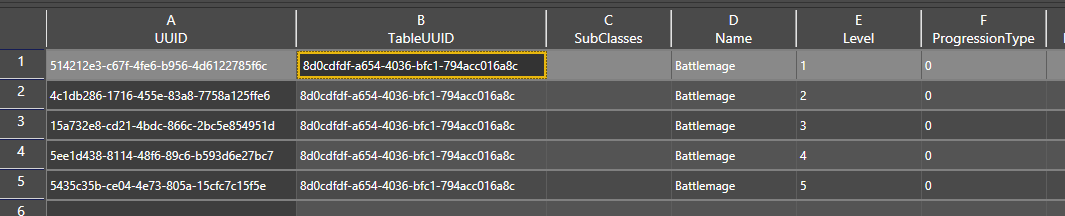
We’ll add three subclasses to our Battlemage class: Macemage, Staffmage, and Swordmage. Make three new rows in your Progressions table, and name them accordingly.
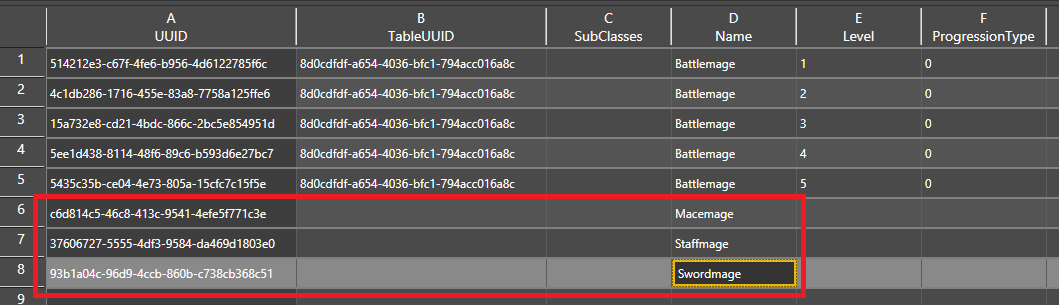
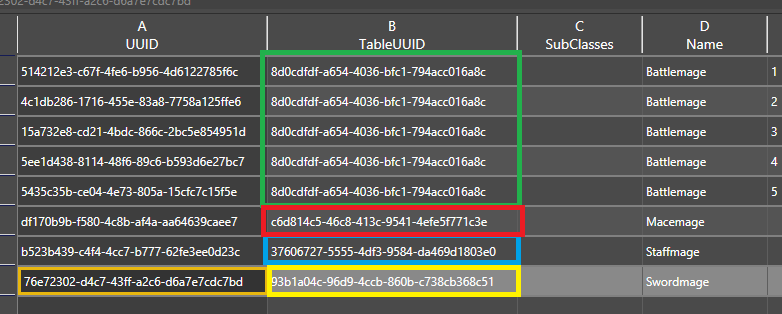
Use the UUID → TableUUID copy trick to give each of these new subclasses an unique TableUUID, and regenerate their UUIDs. You should now have four different TableUUIDs in your Progressions table, like so:
For each subclass, let’s set the Level to 3. That’s the level at which the Battlemage will get access to them.
We’ll also set ProgressionType to 1, which will define it as a subclass progression.
Class Descriptions
Now that we have defined what our class does up to level 5, we have to add definitions for the class in order for it to show up in Character Creation. To do this, we add a ClassDescriptions table:
As always, we start by filling up the Name. Use the same name that you used for the Progressions: Battlemage.
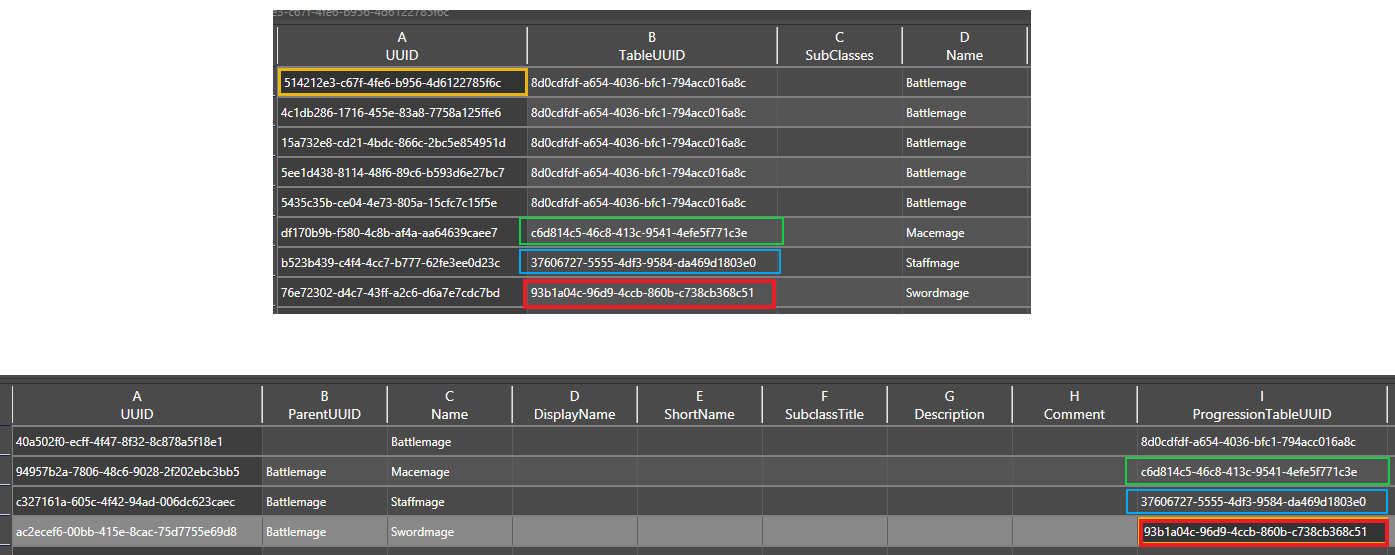
Into ProgressionTableUUID column, copy over the main class TableUUID from Progressions table (in the screenshot earlier, it would be the one in the green box).

There are a few other fields we need to fill in here.
-
DisplayName: This is what the player sees in-game.
-
Description: This is the description of the class in the Character Creation.

-
Primary Ability: We’ll use
Strength. -
Spell Casting Ability: We’ll use
Intelligence. -
Learning Strategy: For classes, this should always be
AllChildren. -
Must Prepare Spells: Does this class need to prepare spells like a Druid or Cleric? We’ll say
No. -
Can Learn Spells: Can this class learn spells from scrolls like a Wizard?
No.

-
CharacterCreationPose: We’ll use one that all classes use -
0f07ec6e-4ef0-434e-9a51-1353260ccff8 -
BaseHp: This is how much HP the class starts with. For the Battlemage, we’ll go with
12. -
HPPerLevel: This is how much HP the class gains with each level. Let’s say
7. -
CommonHotbarColumns, ClassHotbarColumns, and ItemsHotbarColumns describe the default hotbar separations. We will use the default values of
9,5and2respectively.-
The sum of these must always be 16.
-

Multiclassing
If you want your class to appear as an option for multiclassing, you'll need to add an extra row to the ClassDescriptions table.
Under the main Battlemage class, add a new row. This row will be a secondary level 1 that will act as multiclassing progression. Everything can be identical to the original Battlemage level 1 row, except:
-
UUID must be different
-
IsMulticlass should be Yes
It will look something like this:

Now when you go to multiclass, your class will show up among the multiclassing options. The rest of the levels will come from the progressions you’ve already set up.
Save Your Work
Before we continue, make sure to save everything you have done up until this part!
Did you do it?
When you’ve confident you’ve saved your work, close and restart the editor.
Continuing with Class Descriptions
Reopen the ClassDescriptions table in the Uuid Object Editor.
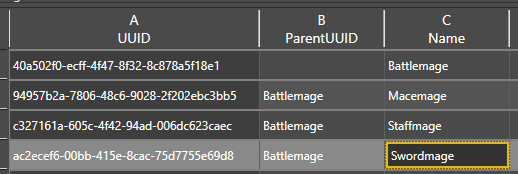
We’ll need to add three new rows - these will be for our subclasses. Fill in the Name for each row with the same subclasses we started setting up earlier.
In the ParentUUIDs for these subclasses, select the class name from the dropdown - in our example, that’s Battlemage.
Let’s first fill in the subclasses' ProgressionTableUUIDs. The process is the same as for the class - open your Progressions table and find the TableUUID associated with each subclass. Copy and paste the TableUUID for each subclass from the Progressions table into that same subclass’s ProgressionTableUUID field in the ClassDescriptions table.
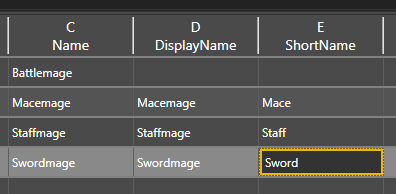
Next, you’ll need to fill the DisplayName, ShortName, and Description for the class and subclasses. The ShortName is, as it sounds, a shorter way of referring to that subclass. This mostly appears on the in-game character sheet. If you don’t fill in a ShortName for the Battlemage subclasses, they’ll appear on the character sheet as:
-
Macemage Battlemage
-
Staffmage Battlemage
-
Swordmage Battlemage
That’s a bit repetitive, so we’ll fill in the ShortNames as Mace, Staff, and Sword. This way, the character sheet will instead say:
-
Mace Battlemage
-
Staff Battlemage
-
Sword Battlemage
For the rest of the columns (L to O), copy the values from the class over to the subclasses.

Save Your Work Again
Once again, make sure you have saved all of your changes.
After saving, close the editor, then reopen it.
Adding Subclass Selection to the Class
Let’s reopen the Progressions table in the Uuid Object Editor.
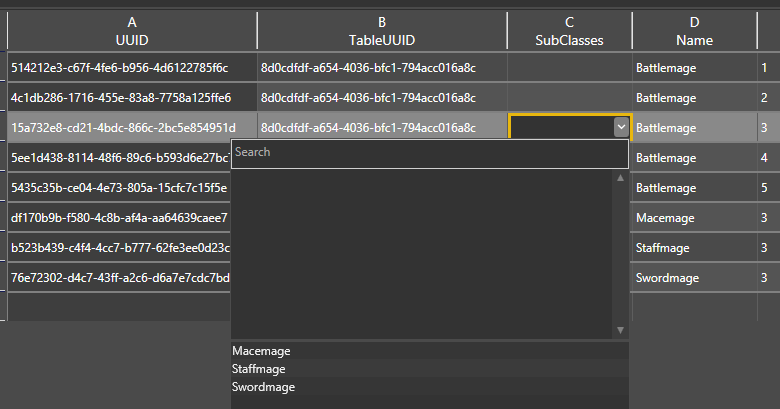
Go to the level 3 progression of our Battlemage. In the SubClasses column, we add all 3 new subclasses by double clicking on them in the dropdown. This allows player to choose which subclass they want to be when they reach level 3 of Battlemage.

With this, we’ve finished the main technical set up of our class and subclasses! Let’s save our work.
Quick Testing
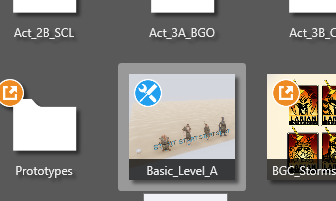
To test our creation thus far, let’s load into a level. For our purposes, Basic_Level_A is fine.
Once the level has loaded, switch into Game Mode.

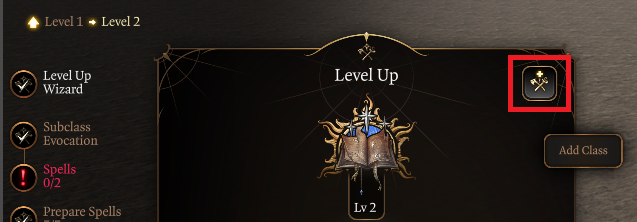
Put your cursor over the character portrait, then press Ctrl+Shift+L to level up your character. In the game, open the Level Up screen, and click on the Add Class button.
Select Battlemage.
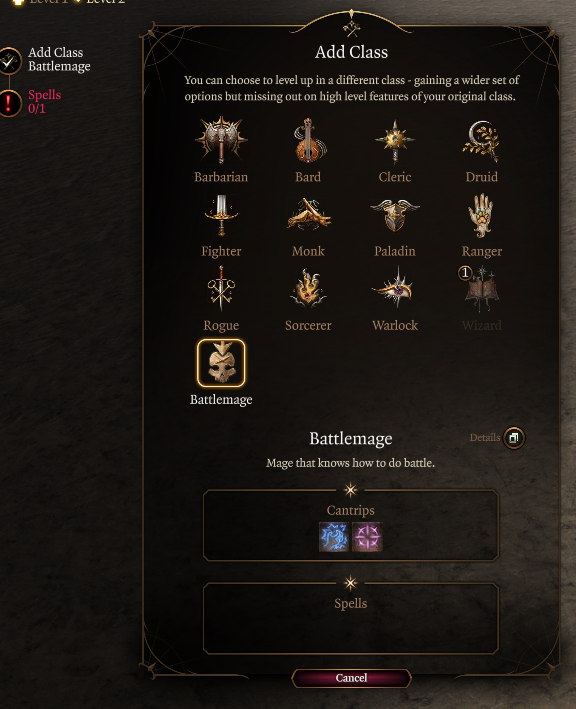
You can see the class description here, as well as the two cantrips we defined for the initial level.
Finish your level up into a Level 1 Battlemage, then level yourself up a few more times until you get to choose a subclass.

You’ll also notice that our character is missing equipment, and that the Battlestance at level 2 is called Class Passives. Let's fix these issues now.
Equipment
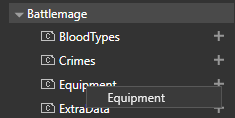
Equipment is defined in the Stats Editor. Just as we created other tables, let’s create a new Equipment table.
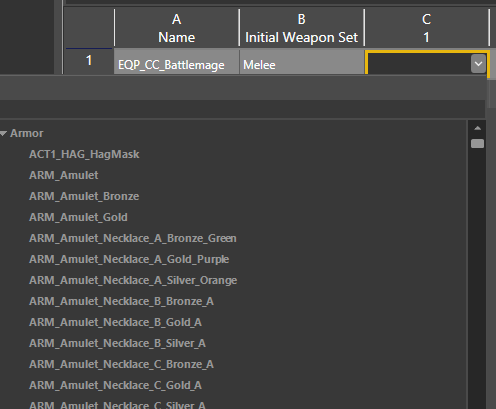
Fill in the Name with something you can identify as the Battlemage’s starting equipment. Following our own internal guidelines, we’ll use EQP_CC_Battlemage, but you can do what you like provided that it doesn’t contain spaces.
We’ll put Melee as the Initial Weapon Set, since we want our Battlemage to show off their Greatsword. In the following columns (1, 2, 3, …), you can define additional items that the character will start with. Trying to fill those fields will open a massive dropdown with all possible items - you can search to narrow down the possibilities.
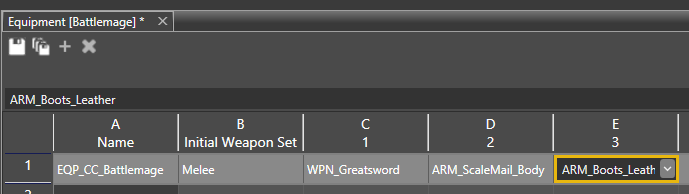
Let’s use WPN_Greatsword, ARM_ScaleMail_Body, and ARM_Boots_Leather.
Now, let’s open up the ClassDescriptions table. Use the Name you defined above (EQP_CC_Battlemage) and put it inside our the ClassEquipment field of the class. Do this for the class only, not the subclasses.

Progression Descriptions
Next we’ll fix the Class Passives name. For this we'll need to create a new ProgressionDescriptions table in the Progressions section:
Let’s fill in the DisplayName and Description we want to show to players for our selection. In our case we want to call it Battle Stance. Remember that SelectPassives(<UUID>,1,Battlestance) we stuck into one of our Progressions earlier on?
This "Battlestance" is now important here. We put it into SelectorId column. Your row should look like this:

Now, if you were test it in Game Mode again, you should see that the selection is properly named:
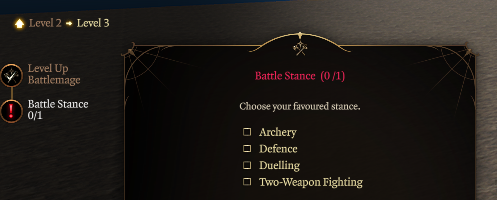
TIP: Having issues seeing this correctly named in game mode? Try closing and restarting the editor.
Class Icon
We just need to change our class and subclass icons, both in Character Creation and on the hotbar.
Preparing Assets
First, we need the images that we'll use for our class and subclass icons. These should be 300x300 pixel .dds files.
IMPORTANT: These icons must be named identically to the class or subclass inside the ClassDescriptions UUID table.
You’ll need to place the images inside your mod folder like so:
\Data\Mods\Battlemage\GUI\Assets\ClassIcons
\Data\Mods\Battlemage\GUI\AssetsLowRes\ClassIcons
Hotbar icons go here:
\Data\Mods\Battlemage\GUI\Assets\ClassIcons\hotbar
\Data\Mods\Battlemage\GUI\AssetsLowRes\ClassIcons\hotbar
That’s all! Your icons should now show up correctly in-game.
DDS Conversion Settings
if image.mode == "RGBA":
if sRGBBool:
target_mode = "BC7_UNORM_SRGB"
else:
target_mode = "BC7_UNORM"
if image.mode == "RGB":
target_mode = "BC1_UNORM"Done!
Now you’ve made a very simple class with three subclasses.
Discussion 100+ comments


A tutorial on creating a new class with several subclasses, going through all of the main setups required.

mod.io uses essential cookies to make our site work. With your consent, we may also use non-essential cookies to enhance your experience and understand how you interact with our services. The latter will be set only upon approval. or read our Cookies Policy.